[L’introduction est en français, le reste du texte en anglais]
Introduction
L’intégration continue (CI) est une méthode de développement qui consiste à une constante et fréquente fusion des contributions d’une équipe dans un dépôt partagé. La qualité du code, la fiabilité et la non-régression sont vérifiées grâce à l’automatisation de la compilation et le test sur carte avant de fusionner chaque modification.
Contrairement aux logiciels, il y a plusieurs points à considérer lors de la mise en place d’une CI pour des systèmes embarqués:
- Les tests ne peuvent pas être exécutés sur la machine hébergeant la CI, car elle n’a pas les mêmes périphériques et la même architecture CPU. L’utilisation de machines virtuelles est possible pour des systèmes avec peu d’interfaces hardware, mais on se trouve très vite limité si le hardware devient complexe ou s’il y a beaucoup de connexions.
- L’exécution des tests doit être non intrusive pour garder le dispositif sous test au plus proche de l’image de production. Cela signifie que les dépendances supplémentaires doivent être limitées et que des outils de tests légers doivent être utilisés.
- Les tests ne doivent pas seulement vérifier que le comportement de l’application est bien celui attendu en exécutant des tests unitaires. Ils doivent aussi tester le système d’exploitation en lui-même ainsi que le hardware et les fonctionnalités du logiciel via des tests au niveau du système.
Généralement, un pipeline de CI pour les systèmes embarqués est composé au moins des étapes suivantes:
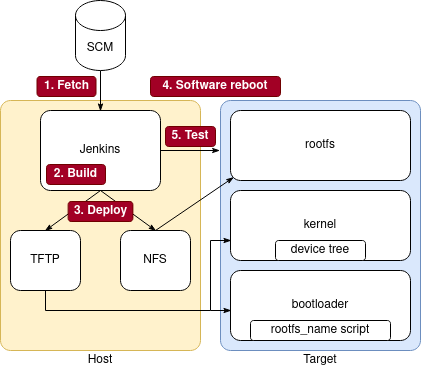
- Récupérer le code (Fetch code): comme pour les logiciels pour ordinateur, le code doit d’abord être récupéré. Ce processus peut être déclenché automatiquement lorsqu’un développeur crée une nouvelle modification.
- Construction de l’image (Build): L’intégralité de l’image du système doit être recompilée, y compris le système d’exploitation et les applications. Cette étape peut être étendue pour vérifier la qualité du code avec des outils d’analyse statique et peut parfois être accélérée en exploitant le cache de génération.
- Déploiement sur la cible (Deploy on board): La nouvelle image compilée doit maintenant être déployée sur la cible. Cette étape peut inclure le flashage du disque, la configuration d’un démarrage à partir du réseau, le redémarrage de la cible…
- Configuration et test: Une configuration additionnelle de l’environnement peut être requise avant de lancer les tests.
- Intégration du code (Code integration): Une fois que le code a été testé avec succès, il peut être intégré sur une autre branche, un autre dépôt ou être livré sous une autre forme.

La dépendance au hardware et les contraintes de ressources rendent difficile la recherche de solutions d’intégration continue prêtes à l’emploi pour le monde de l’embarqué. Cet article présente un projet d’intégration continue open source pour les systèmes embarqués qui est auto-hébergé et peut être facilement personnalisé pour un large éventail de cas de figure dans l’embarqué.
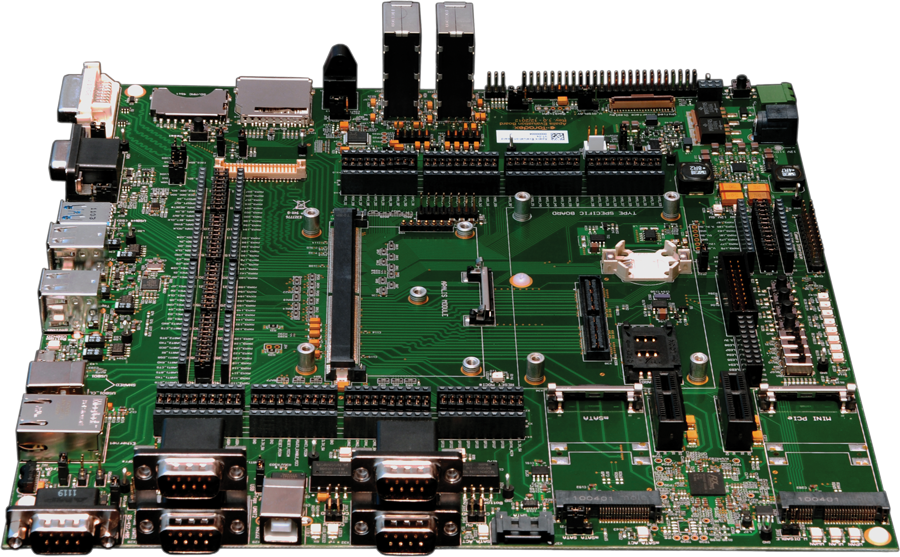
Dans le but de valider cette approche, un cas de figure réel a été déployé en se basant sur l’i.MX6 Toradex Apalis Evaluation Board.

En complément, un pipeline équivalent a été développé pour une machine QEMU. Il implémente la chaîne complète de CI et fait tourner les mêmes tests, mais sans le besoin d’avoir la carte embarqué en physique.
CI deployment
Jenkins is a widely-used automation server that enables building, testing and deploying the source code on a CI pipeline. It includes installable plugins for handling specific features like SSH connection or the visualization of the pipeline progress and test results.
In order to facilitate reproducibility and configuration, the Jenkins server has been deployed on a Docker container. Source code and instructions on how to use it can be found on https://github.com/savoirfairelinux/base_ci.
Additionally, the Jenkins pipelines used on this Proof of Concept can be found on https://github.com/savoirfairelinux/base_ci_pipeline.
The pipelines can also be used as a template for similar projects.

Build automation
In our example, we used the Yocto project to get a Linux distribution. The Yocto project is an open source collaboration project that helps to produce custom Linux distributions for multiple platforms. It is organized in layers, giving the freedom to easily customize your distribution on top of Yocto base layers and board makers’ layers.
Fetch
The build stage is preceded by the fetch operations. In this stage, the goal is to import sources in the CI environment. During our work, we have used the Toradex sources imported with repo, a tool created to easily fetch sources from multiple git repositories and organize them locally as you want.
We could also easily imagine fetching sources from GitHub, GitLab, Gerrit… Jenkins can as well automatically trigger a job if there are any changes on a remote repository.
Build
Before deploying an image on a target, the CI must ensure that the build succeeds. The build artifacts need to be generated in a clean workspace for reproducibility.
As we were using a Toradex Apalis i.MX6, we wanted to base our work on a generic image provided by Toradex for this board, which does not include extra testing tools. Consequently, we have used the bare manifest provided by Toradex to download the sources with the repo tool.
We have selected the tdx-reference-minimal-image provided from the layer meta-toradex-demos. The only additional installation was python3 in order to be able to use Ansible. It was added in the local configuration of Yocto (CORE_IMAGE_EXTRA_INSTALL += « python3 »). To greatly quicken the build, we use a persistent Yocto sstate cache in the Jenkins docker that permits reusing unchanged artifacts across builds.
To ensure build reproducibility, we have used CQFD to set up the build environment. CQFD is a tool developed by Savoir-faire Linux which abstracts Docker complexity and automates it to attach your current working directory into a controlled and reproducible container. The objective is to simplify the usage, the sharing and the update of a build environment across multiple machines and team members. In a CI context, it is an essential feature since the host machine only needs Docker and CQFD installed to be capable of building the software.
Deploy on target
Ensuring that the code compiles is a good first step, but nothing has verified yet that the last modifications did not break the previous features. Therefore, running tests after building is required to assert code quality and detect regressions.
In order to have automatic image deployment just after the build, we have configured the board to boot over the network. A TFTP and an NFS server are needed to import the duo device-tree + kernel and the rootfs respectively. To ease the deployment of these two servers, we decided to create two docker containers launched along with the Jenkins docker server. However, they could also be hosted directly on the machine running the CI, or even on different machines with some tweaks.
On the target side, the bootloader needs to be configured to access the TFTP and NFS servers. Thus, we have configured U-Boot accordingly:
setenv serverip 192.168.X.X
setenv ipaddr 192.168.X.X
Secondly, we need to get the device-tree and the kernel image using TFTP:
tftp ${kernel_addr_r} ${serverip}:zImage
tftp ${fdt_addr_r} ${serverip}:imx6q-apalis-eval.dtb
Then, we need to configure NFS as a source for the rootfs:
setenv bootargs console=${console} root=/dev/nfs rootfstype=nfs ip=dhcp nfsroot=${serverip}:${rootfs_name},v4,tcp
Finally, we can launch the boot by executing:
bootz ${kernel_addr_r} - ${fdt_addr_r}
This configuration can be automatically executed each boot by setting the above commands in the bootcmd variable.
To ensure that only the latest rootfs image that was compiled is run, we added a timestamp to the rootfs directory name. Each boot, the Jenkins pipeline will generate an U-Boot script to edit the environment and point to the correct rootfs. This script will be downloaded by U-Boot in TFTP and sourced to set rootfs_name variable. The unused rootfs directories are later cleaned up.
Once U-Boot is correctly configured, all that is required to boot on the newly deployed image is to reboot the board. In our case this is done by a software reboot command from the Reboot target pipeline stage, but some other setups can include programmable plugs to enable hardware reboots.
For the first build with Jenkins, the board will probably not boot if you already have correctly configured U-Boot because no rootfs was available. A hardware reboot will be required at the end of the first build, as a software reboot will not be possible.

Remote management and tests
Once the newly generated images have been booted on the target device, the CI can start running the tests. This step requires minimal intrusive interaction with the target machine. Ansible is a tool that offers the automation of remote tasks over an SSH connection and Python3 on the target machine. Please note that other tools, like the standalone SSH protocol itself, could be used as an alternative to Ansible for this purpose.
Ansible organises its tasks in playbooks that can be remotely executed according to an inventory of machines (add link to our base_ci/ansible on GitHub/GitLab). In our pipeline, Ansible handles the reboot of the target machine from the previous image. It also sends and runs the tests on the target, and finally fetches the result to generate a report
A mechanism for remote and non-intrusive verification has to be used, usually testing both high and low level functionalities. We decided to use Cukinia. Cukinia is a shell-based testing tool developed by Savoir-faire Linux. It is designed to run simple system-level validation tests for Linux-based embedded firmwares. Cukinia is integrated in the Yocto base layer meta-oe.
Once the test results are fetched, a JUnit report is displayed by the CI.

Code Integration
Having the result of the tests for each build can lead to two scenarios. In the case where there are failed tests, the developer should be capable of easily identifying the cause of the broken scenario and fixing it. On the other hand, once the CI passes the tests successfully, the code can be considered ready for integration. Normally, this stage might represent merging the code on a “release” branch, pushing it to a different repository or launching a more complex delivery process.
Conclusion
Having a CI in embedded system software development is a huge help to detect issues and resolve them as early as possible. Adding a test on target step in this CI takes part in increasing the quality of the released code.
This article proves that there is a simple way to deploy and run tests quickly and automatically on an embedded device. The example that we are providing, is of course customizable by creating your own pipeline for your context.


